Red Carpet Manicure: Gel Polish


Gel nail polish, by Red Carpet Manicure (RCM), is one of my favorite things right now. RCM provides a protective coat which helps natural nails grow longer without filing down or damaging the nail, unlike acrylics. Most importantly, the polish stays put (without chipping) and yields a gorgeous manicure for 2-3 weeks!

Although I am a professional Aesthetician, I’m by no means a professional manicurist. Because of this, I know you too will be able to tackle the RCM with ease. The directions are easy to follow and the manicure itself takes under 30 minutes to achieve– that includes dry time… well, there is virtually no dry time and the polish finishes nice and hard, as opposed to traditional nail lacquers; we’ve all meticulously painted our nails only to find the lacquer smudged, dented, or chipped as a result of mundane actions. Once the gel polish is cured, it really is set.

Here are a few tips (and pics) from my nail experience:

securedownload

1. I started with clean, dry nails. Before applying polish, RCM suggests shaping the nail, pushing back cuticles, and roughing up the nail itself.

securedownload-1

2. Roughing up the nail does not mean filing it down. Instead, you’re gently buffing away the nail’s natural shine in order for the polish to adhere more successfully (please pardon the soon to be tamed cuticles).

securedownload-3

3. The base coat takes 30 seconds to set and each layer of colored polish takes approximately 45 seconds to cure. Although the directions say the color takes 45 seconds, an RCM representative and I agree that 1 minute works best when using the RCM LED light–just to be safe. In addition, I like to leave nails under the light for 1 minute when curing top coat (Brilliance). The above color photographed a little darker than it is in actuality. However, RCM’s Oh So 90210 is quite comparable to OPI’s Strawberry Margarita.

sally-hansen-extreme-wear-nail-polish-white-on

4. I like French nails and found this effect relatively easy to achieve with RCM. Upon fully completing the gel manicure in Tre Chic (this includes top coat application), I swiped Sally Hansen’s White Out across the nail tips and allowed the polish to dry for 15 minutes. Finally, I applied RCM’s Brilliance and cured for 1 minute to set my French nails.

securedownload-5

A trick that I recently learned from my manicurist, to prolong white tip longevity, is gently swiping acetone across the nail to remove dulling agents. This tip is only good for use on gel or acrylic nails and should be done in a swift, singular motion.

Enjoy 🙂

Reader Write-In: Mineral Makeup (In Memory of Joan Oliver)


Dear Ashley Evelyn,

Help! I need a new liquid foundation and powder! I’ve been using Mary Kay but I’m just not feeling it anymore and my aunt isn’t selling anymore. I’m in between normal and oily skin. And I like to hide my blemishes! I bought cover girl powder and it made me break out, so I need a good brand please and thank you!

-S.B.

Dear S.B.,

In my opinion, mineral makeup is the greatest thing since sliced bread and is good for all skin types. Not only does mineral makeup provide an array of coverage (from light to heavy), but it also allows the skin to “breathe.” However, the skin doesn’t breathe like our lungs do. In a nut shell, when properly functioning, the epidermis is constantly regenerating cells, sloughing dead cells, and expelling impurities. When dead skin cells, dirt, and excess oils are trapped within the follicle (pore), the tribulation of the common blemish occurs in three stages: Comedones arise (blackheads); white blood cells rush to fight underlying infection and form Pustules (whiteheads); finally, Papules (cystic acne) develop as a result of severe infection. Good skincare practices such as cleansing the skin, twice daily, and developing frequent exfoliation regimens can lessen these occurrences. However, switching to a mineral foundation also helps the skin to breathe easy– and function as intended.

view_of_what_causes_acne_poster-rc6ed34761aa0419f8f7a20a3a27d581d_g13_400

Making the switch from liquid foundation, to mineral powder, isn’t always easy for users. Before I became an Aesthetician, I suffered from severe cystic acne and loaded my face with thick, liquid foundation on a daily basis. When my Aesthetician suggested that I switch foundations, I told her that I couldn’t rely on mineral makeup to cover up my blemishes. She countered with the fact that my makeup wasn’t doing me any real favors in that department (the jig was up– my face was covered in pustules & papules) and my formula of choice perpetuated the problem.

Bare-Escentuals

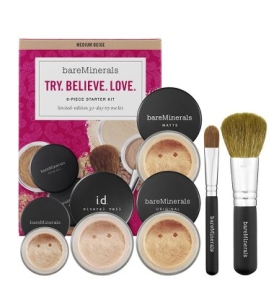
At the time, Bare Minerals Makeup was known as Bare Escentuals– and only available through QVC. Today, the line may be found at department stores across America and specialty makeup stores such as Ulta. However, the Ashley Evelyn of yesterday picked up the phone and ordered the Bare Minerals starter kit. I was amazed by how beautiful my skin looked and felt under mineral makeup! No longer did I feel like I was wearing an oily mask of paint to the world. Instead, the light formula allowed my clear skin (forehead, nose, and chin) to shine. The concealer brush added heavy coverage where I needed it most (cheeks). And, because Bare Minerals foundation acts as a dual concealing medium and foundation in one, my blemishes virtually disappeared upon application.

Today, Bare Minerals appears in its traditional loose powder (my medium of choice), but is also found in pressed powder and liquid form.

HONORABLE MENTION:
1. Jane Iredale Makeup
2. Pur Minerals

aef77a49-1ce7-4761-a35f-bfffddb7ea3a

This post is dedicated to the late, Joan Marie Oliver. She taught me how to be a great Aesthetician and provided me with skincare when no one else wanted to–or thought they could– help my problem skin. I am eternally grateful to Joan for her help and insight. Rest in peace, Joan. And, thank you.